Top Image

Top Image

Monday, May 29, 2017

New Battletech Mechs in Action

Somewhere on the Periphery...


Four House Davion mechs march to secure a small city from the mercenaries of the Grey Death Legion.

A Longbow, King Crab, Bombadier and Crusader.

Two enemy Longbows and anther mech that was swapped out for a Warhammer due to a clerical error.

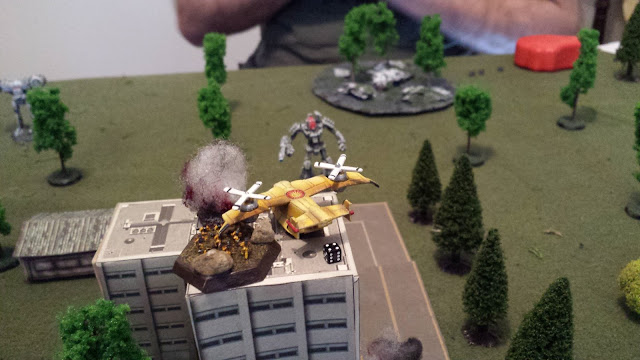
Davion forces are supported by two platoons of infantry with missile launchers, deployed in a Karnov transport VTOL.  These rush forward, deploying infantry onto rooftops to spot for LRMs in the mechs.


The enemy Battlemaster takes some shots at the transport, but misses.


The Karnov quickly deploys to the other side of the city, dropping its infantry near the approaching enemy.


Meanwhile the Davion mechs stay in close formation as they move into the city.


As the now empty Karnov retreats, the infantry on the rooftop fire their missiles into the Longbow's back.  My opponent did not fear the infantry, as they do little damage.  This, as is happened, was unwise.


The missiles tore through the weak rear armor and connected with the Longbow's ammunition stores, turning the mech into a fireball of exploding metal.

As a rules note, we were using simplified rules, allowing infantry to deliver their damage to a single spot as opposed to splitting it into 2pt damage groupings. After this infantry "1-shotting" the Longbow, we'll be biting the bullet and using the damage grouping rules for next time.


With one longbow down, the Davion force concentrated its fire on the surviving missile boat. LRMs came down like sheets of rain, but most missed their target. Several connected, shredding the mech's armor. Return fire was minimal.


The enemy Battlemaster moved into flanking position, hoping to break up the very effective indirect fire from the Davion force.


But with one Longbow down and the other backing off, the Davion force was able to turn nearly all of its firepower on the flanking Battlemaster.


Oh, and the Grey Death Legion also had a single ineffective Locust mech.  Intended as a spotter, it took too long to get into position (moving around the whole city to avoid shots), and ended up only lightly harassing me force.


Moving into close range, the King Crab opened up with its dual AC-20s, knocking pieces off the Battlemaster. Concentrating the return fire on the Crab did little beyond scratch the paint of the massive assault mech.


After ages of plodding through the city, the Warhammer finally found the battle.


Ignoring the slow warhammer, the Davion force now completely focused on the Battlemaster.


The warhammer was able to connect with a rear shot on the Bombadier, destroying the rear armor but not penetrating into the mech's internals.


Meanwhile the Infantry force decided on a risky redeployment, under fire from a Longbow (1 shot would have downed the VTOL).  The fast moving transport was able to take evasive action and get clear.


Meanwhile, the Battlemaster saw both of its legs blown off, but propped itself up on a single arm to continue the fight for one more turn.


With the Battlemaster nearly finished, the other mechs turned to face the Warhammer while the King Crab was left to finish off his prey.


With no limbs left, the Crab finished the mech off by crushing the center torso with a stomp/kick.


The Warhammer stood nearly alone now...


Two PPCs against a massive barrage of missiles...


It didn't last long.


Turning towards the last mercenary in the area, the wounded Longbow, the Davion force moved quickly to finish it off.


A headshot ended the game...


Friday, May 19, 2017

Painting Battletech (2 of 2)

We last left our heroes basecoated and highlighted. Now we move on..

Step 9: Wash.  Wash, not dunk, and certainly not drown. The color and shading are set, we just want to get some dark into those cracks.  With a tiny brush, I carefully inserted Citadel Sepia Shade into the cracks and only into the cracks. This is slow work, but most of the time if you make a mistake (and a watery wash is tough to control) you can brush off the excess with a finger.  This step really transforms the mech, and works very, very well with the metal models in particular.

From left:  Hussar, King Crab, Crusader, after the sepia wash.
Step 10:  Secondary Colors.  In this case, a very dark gray (Dunkelgrau), so dark it looks black from a distance.  It provides a nice contrast with the bright yellow, and breaks up the mech a bit visually.  This is all brushed on - carefully, as the yellow will not cover that gray. If I had any major accidents I'd have to go back to the airbrush, using both white (to cover) and yellow. Thankfully, that didn't happen here.


Thumper Artillery

The whole family: (from left) King Crab, Stinger, Hussar, Crusader, Bombadier, Wasp, Thumper.
With the secondary color brushed on, it's time for highlighting.  Now, what follows is completely optional, and most Battletech players probably wouldn't have bothered to go this far. However, at this point I was having a blast and really wanted to bring these to the next level.  So I decided that rather than simply drybrush on the highlights for the gray, I'd go back to the airbrush.  That means lots and lots of masking, covering all the yellow parts of the mech.

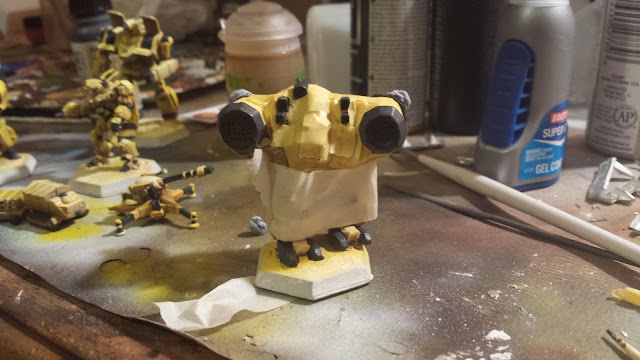
Step 11a: Masking.  A combination of tiny 2mm Tamiya masking tape, regular size masking tape, and bluetac putty to take care of curves.


Almost the entire mech is covered. The masking process took far, far longer than the actual highlighting that follows.

Step 11b: airbrush highlight the second color. For this I used a Barley Gray, and then hit it with a lighter highlight of the same gray mixed with a good bit of white.  


Again, drybrushing would have been way faster.


But drybrushing wouldn't have come out like this:


Funny thing about that King Crab: considering how little gray there was to highlight, I intended to just drybrush. I admit, part of that was that I didn't want to go through the hassle of masking.  But after I highlighted everything else, I just said "screw it" and freehanded the highlights for the King Crab, Stinger and Wasp without any masking at all. Incredibly, I did so without any mistakes.  Ok, there's a slight bit of overspray on one of the mechs, but no one but me will be able to see it unless I tell you which mech and where.   It's utterly invisible in the pictures.

The airbrush allows for a much smoother highlighting on those missile pods and feet.
Step 12:  Cockpits.  There's been a lot written on the internet about "jeweling" cockpit glass. I've never been happy with the result, whether I use an airbrush or a regular brush.  Sadly, this time is no exception.  I may have to try again on these later.  I tried the brush method this time around, brushing on a base of Gory Red, then watered down layers of Gory Red, Blood red, and orange, blending them together.  The blending was moderately successful, but I know it could be better. Practice!


I added a few white dots as "lens flares", again with mixed results.


Step 13: Details.  Painting missiles white, touches of Steel color, including some drybrushing of places likely to see wear (hands, feet, engines).


I even painted the missiles on the Crusader's collars, which was a bit nutty.

Step 14: Final Drybrush.  This is just to bring out the edges for some final highlights.  I used Buff, a sort of very light yellow, on the hard yellow edges, and straight White on the gray edges. This is the lightest of light drybrushing. You don't want to see the paint at all, just the illusion of light catching the edges. With the airbrush, the shading and highlighting is as good as I can get it, but this manual step hardens the edges and makes the thing seem like it's 50+ tons of metal.


Step 15: Basing.  I simply painted the edges Flat Brown and flocked the base with white glue and Woodland Scenics Summer Grass.


Step 16: Decals.  Obviously optional, but the 1st Argyle Rangers are a patriotic bunch.  I did this while the flocking was still drying.


Step 17: Final basing touches.  Army Painter makes excellent little bushes for basing which are super easy to use. I also have a small container of desert colored stones that go with my color scheme.

Step 18:  Sealing.  I sealed these with Vallejo Satin Varnish via the airbrush. 

And with that, we're done!  Take a look at the final product below.

The Hussar leads the pack.


The Longbow, bought entirely because it looks so cool.

Wasp.


Davion Pride from this King Crab.

The Crusader, the mech I'm most looking forward to playing.

Back of the Bombadier.

Stinger.

Back of the Stinger.

Thumper Artillery with tracked tow and ammo carrier.